Bambulab Remote Print Start from HomeAssistant [DEPRECATED]
Requires >= Rev 46 of Basic Implementation Flow
Note: This flow is not currently supported. Eventually I may look back into this so you can map AMS filaments with better control.
Ever wanted to start a print on your Bambulab 3D Printer remotely, without accessing bambu studio or the printer screen? Well now it's (sort of) possible!
1) Basic NodeRed Setup
2) Home Assistant Dashboard YAML (optional but compliments this)
3) Advanced Flow with FTP, Postgres and Grafana (Only needs FTP setup and requirements)
Note: I do not know if this will work for P1P's. Additionally, if you name your plates custom names with OrcaSlicer, I do not know if it will work fully.
NodeRed Configurator
Complete the configurator below and import the new flow-group into your existing NodeRed flow.
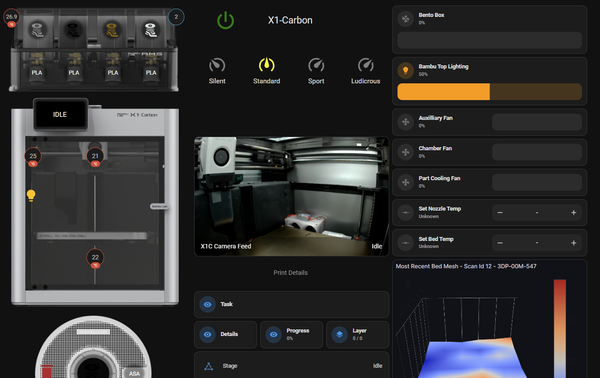
The HA Printer Device Name as before in previous guides is simply the device name of your printer from the NodeRed integration. Usually it is <printer_model>_<printer_name>.
This flow will add a new device for your printer to HomeAssistant, the name will be the same as your printer but with the suffix _Directory. This is to help distinguish it from the base printer.
HomeAssistant Dashboard YAML

Ideally, if you have completed the dashboards guide before, you can put this alongside it. Edit your dashboard, go to where you want to put this and add a manual card, then paste in the yaml.
This YAML requires the same custom repositories from HACS as the previous dashboard's guide.
The HA Printer Device Name is the same as above.
Limitations
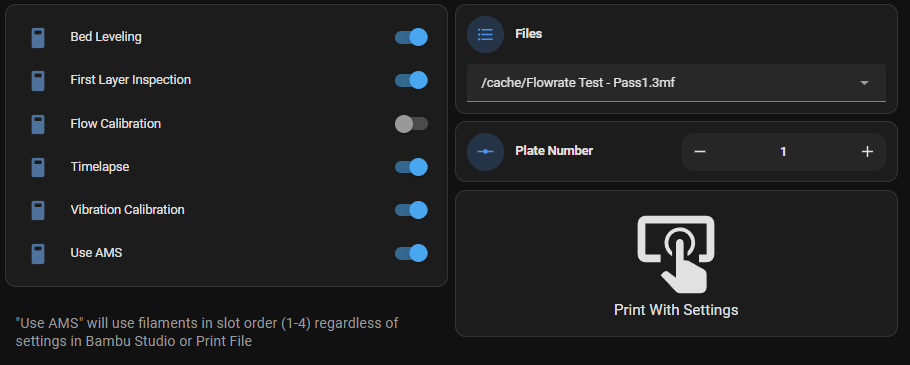
There are a few limitations with this setup. The largest being regarding the use of the AMS. All print options are available, however, this will treat your loaded files as if they were pre-sliced files. This means that it does not let you configure AMS slots for the prints. If you have Use AMS toggled on, a single material print will always use AMS Slot 1, a multi-material print will use materials in order from left to right (slots A1-A4), in the order they were added into the 3mf during slicing (not in sync with AMS).
The second limitation is for the plate number. You will need to know which plate number you wish to print. It should fail if the plate submitted does not exist, but I cannot guarantee this. Most of the time you will print plate 1.
Lastly, when it comes to the name field, I highly suggest ignoring this and never setting it. This sets the subtask print name which, while nice to see, is also used by the advanced flow's FTP in order to download the 3mf file. If it is left blank then this flow mimics the default slicer behaviour - giving the name of the print file, except I can remove the other path details such as /cache and .gcode.3mf. It will still work this way.